How to build a WordPress frontend using Webstudio (no-code builder)
Learn how to use Webstudio's advanced visual builder to create a WordPress frontend without writing code, including an overview page, a blog page, and a sitemap.
A lightweight WordPress template is in the Marketplace. To start a new project, clone the template. To integrate with an existing project, visit the Marketplace and insert the various pages.
By the end of this tutorial, you will have the following using WordPress and Webstudio:
Headless WordPress CMS – Make your WordPress website headless.
An overview page – One page that contains all the Posts in WordPress, each with a link to view that Post on a blog page (a dynamic page).
A blog page – A template displaying the Post matching the URL viewed. If the user is on /blogs/mouse, the Dynamic Page will fetch the WordPress Post with the slug "mouse" and display its contents.
A sitemap – A dynamic sitemap containing the Posts in WordPress.
Video Tutorial
Webstudio is a visual builder that connects to headless WordPress
Webstudio is solely focused on creating a visual builder for the frontend. It's backend agnostic, meaning we don't lock you into using any one backend/CMS/database.
In the case of WordPress, this enables you to leverage your blog data and the WordPress blogging engine without having to use WordPress page builders and lackluster performance.
Webstudio enables you to build a custom frontend for headless WordPress without writing code. It's an alternative to a WordPress headless framework that requires a time-consuming custom-coded frontend.
Webstudio is open source, has all CSS properties, and is dynamic at the speed of static.
Why Headless WordPress
You already use WordPress and want to keep your blog data there using it as a headless CMS.
You want to start a new blog and like the flexibility of WordPress.
Overall, you want to use the WordPress CMS and not the page builders or WordPress themes. Instead, you want something that uses next-gen infrastructure, such as a Webstudio that leverages the Cloudflare Edge to create fast user experiences.
This setup lets you take advantage of the flexible blogging capabilities without bloating your site with WordPress Plugins that come with a traditional WordPress setup.
Steps to building a WordPress frontend using Webstudio
1 Create a dynamic page
In this step, you will create a Dynamic Page in Webstudio. Think of it as your Post template – one page that dynamically changes based on the URL. The URL will contain a dynamic path, and its value will be used to fetch the Post from WordPress.
Go to your Webstudio project > Pages > Create a new page.
Add a path with at least two segments in the Dynamic Path field. This example uses the path /blogs/:slug.
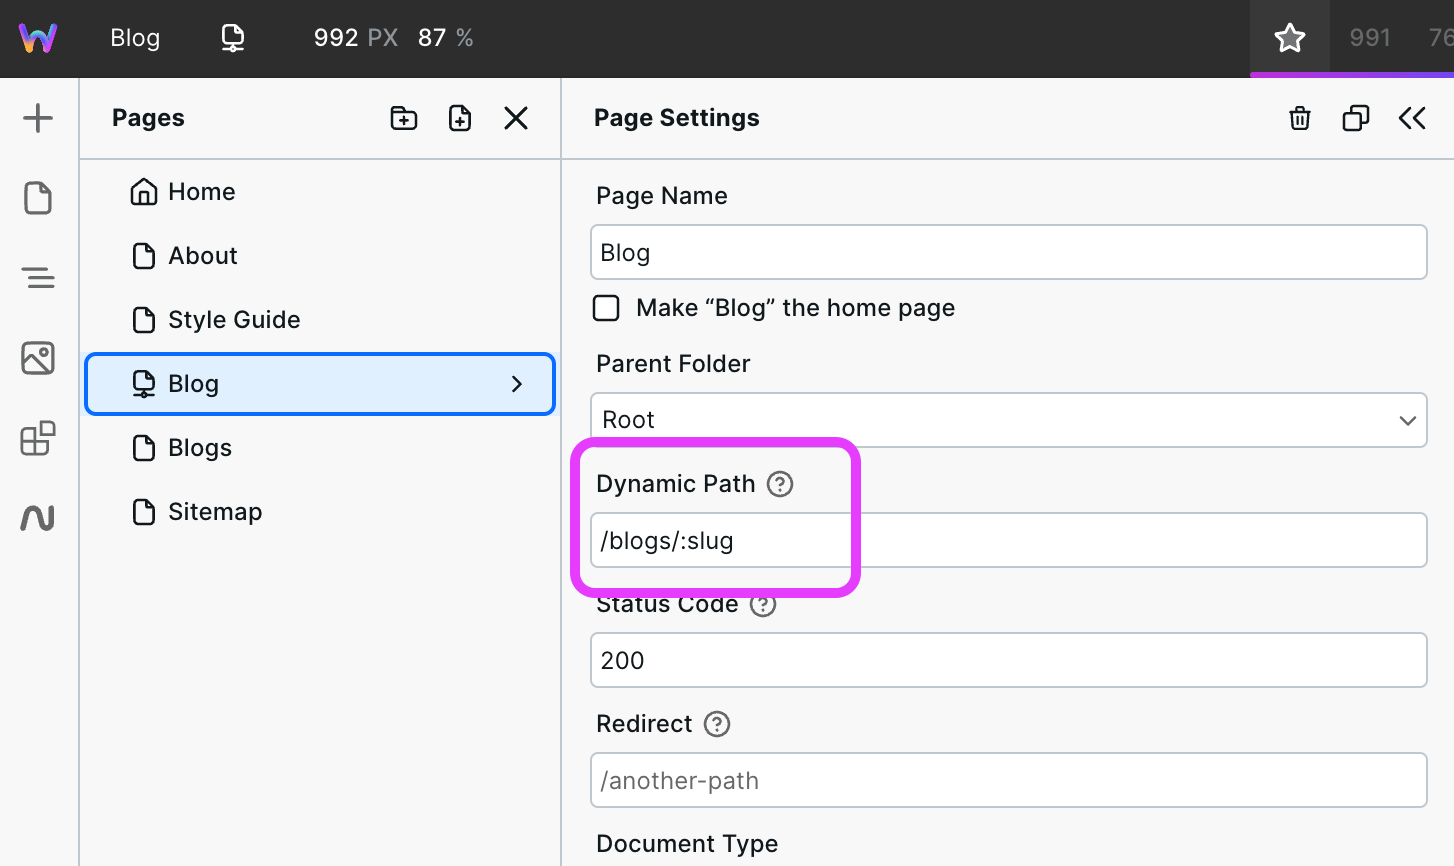
The first segment should be something to describe your records (e.g., blogs)
The second is a dynamic component. You can name it whatever. This example uses
:slug. The value will be used in the following steps.
2 Make WordPress headless
In this step, head over to your WordPress dashboard and install the WordPress GraphQL plugin.
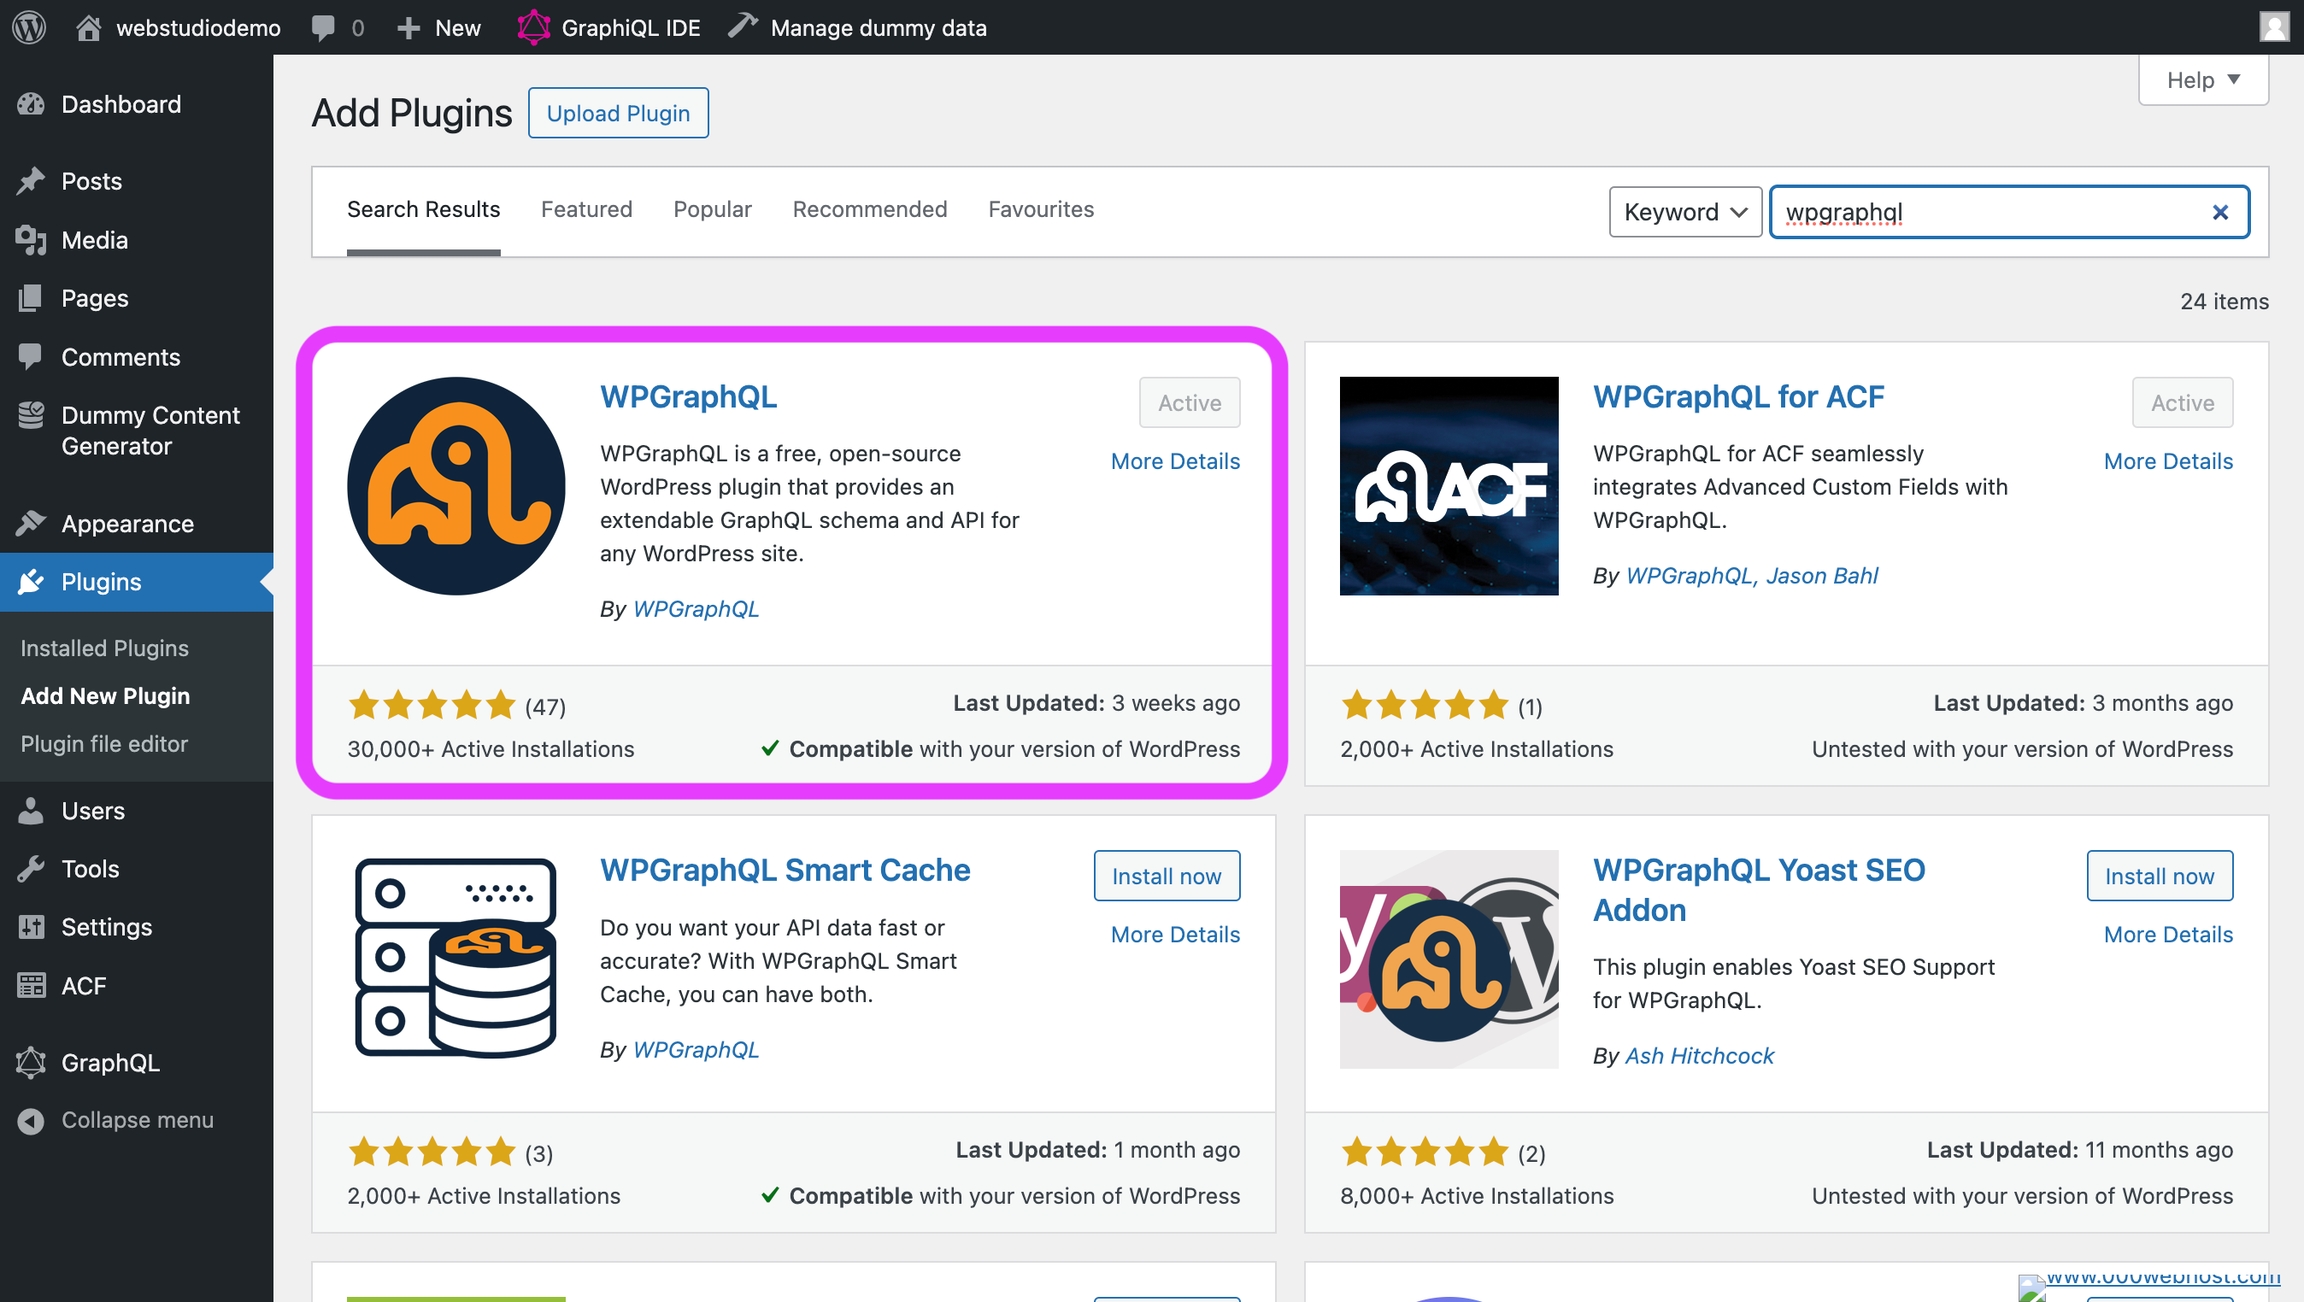
While you can use the WordPress REST API, the GraphQL API is preferred as it lets you fetch the data you need and nothing more. Webstudio also supports the WordPress REST API if you wish to use it.
Once installed, activate the WordPress plugin.
The data available in the GraphQL API will include the default WordPress fields. If you have added plugins that extend the Post fields, such as Rank Math and Advanced Custom Fields, you'll need to install additional GraphQL plugins to make their data available.
You now have a headless WordPress setup that is ready to be your content management system.
If you are converting an existing WordPress site to leverage the headless WordPress architecture, make sure you go back and remove any of the plugins, themes, pages, and anything else that is no longer needed. Eliminating unnecessary items will lead to improved performance and security.
3 Fetch WordPress data
In this step, you will configure a Resource in Webstudio to fetch data from your headless WordPress site.
Create a GraphQL Resource variable
Go to the Navigator on the left > select Body > Settings on the right > and create a new variable with any name, and in type, use GraphQL.
URL
In the URL field, add your WordPress website's URL and append /graphql, an endpoint the GraphQL plugin makes available. If your WordPress website is available at wordpress.example.com, you can use wordpress.example.com/graphql.
Query
Next, assemble a GraphQL query using Query Composer, located in GraphQL > Query Composer. You will use this feature to construct a query without writing any code.
Under Post (note, it's singular Post, not Posts), click the checkbox of every field you want to fetch. Some fields have some gotchas, so look out for these scenarios:
Some fields, such as "content", have a "format" child option once checked. Always check this and select "Rendered".
When requesting an image, such as a featured image, select four child values: altText, sourceUrl, width, and height (those dimensions are within mediaDetails).
The data you need is often in "child" fields. Look around and keep checking boxes until you get what you need.
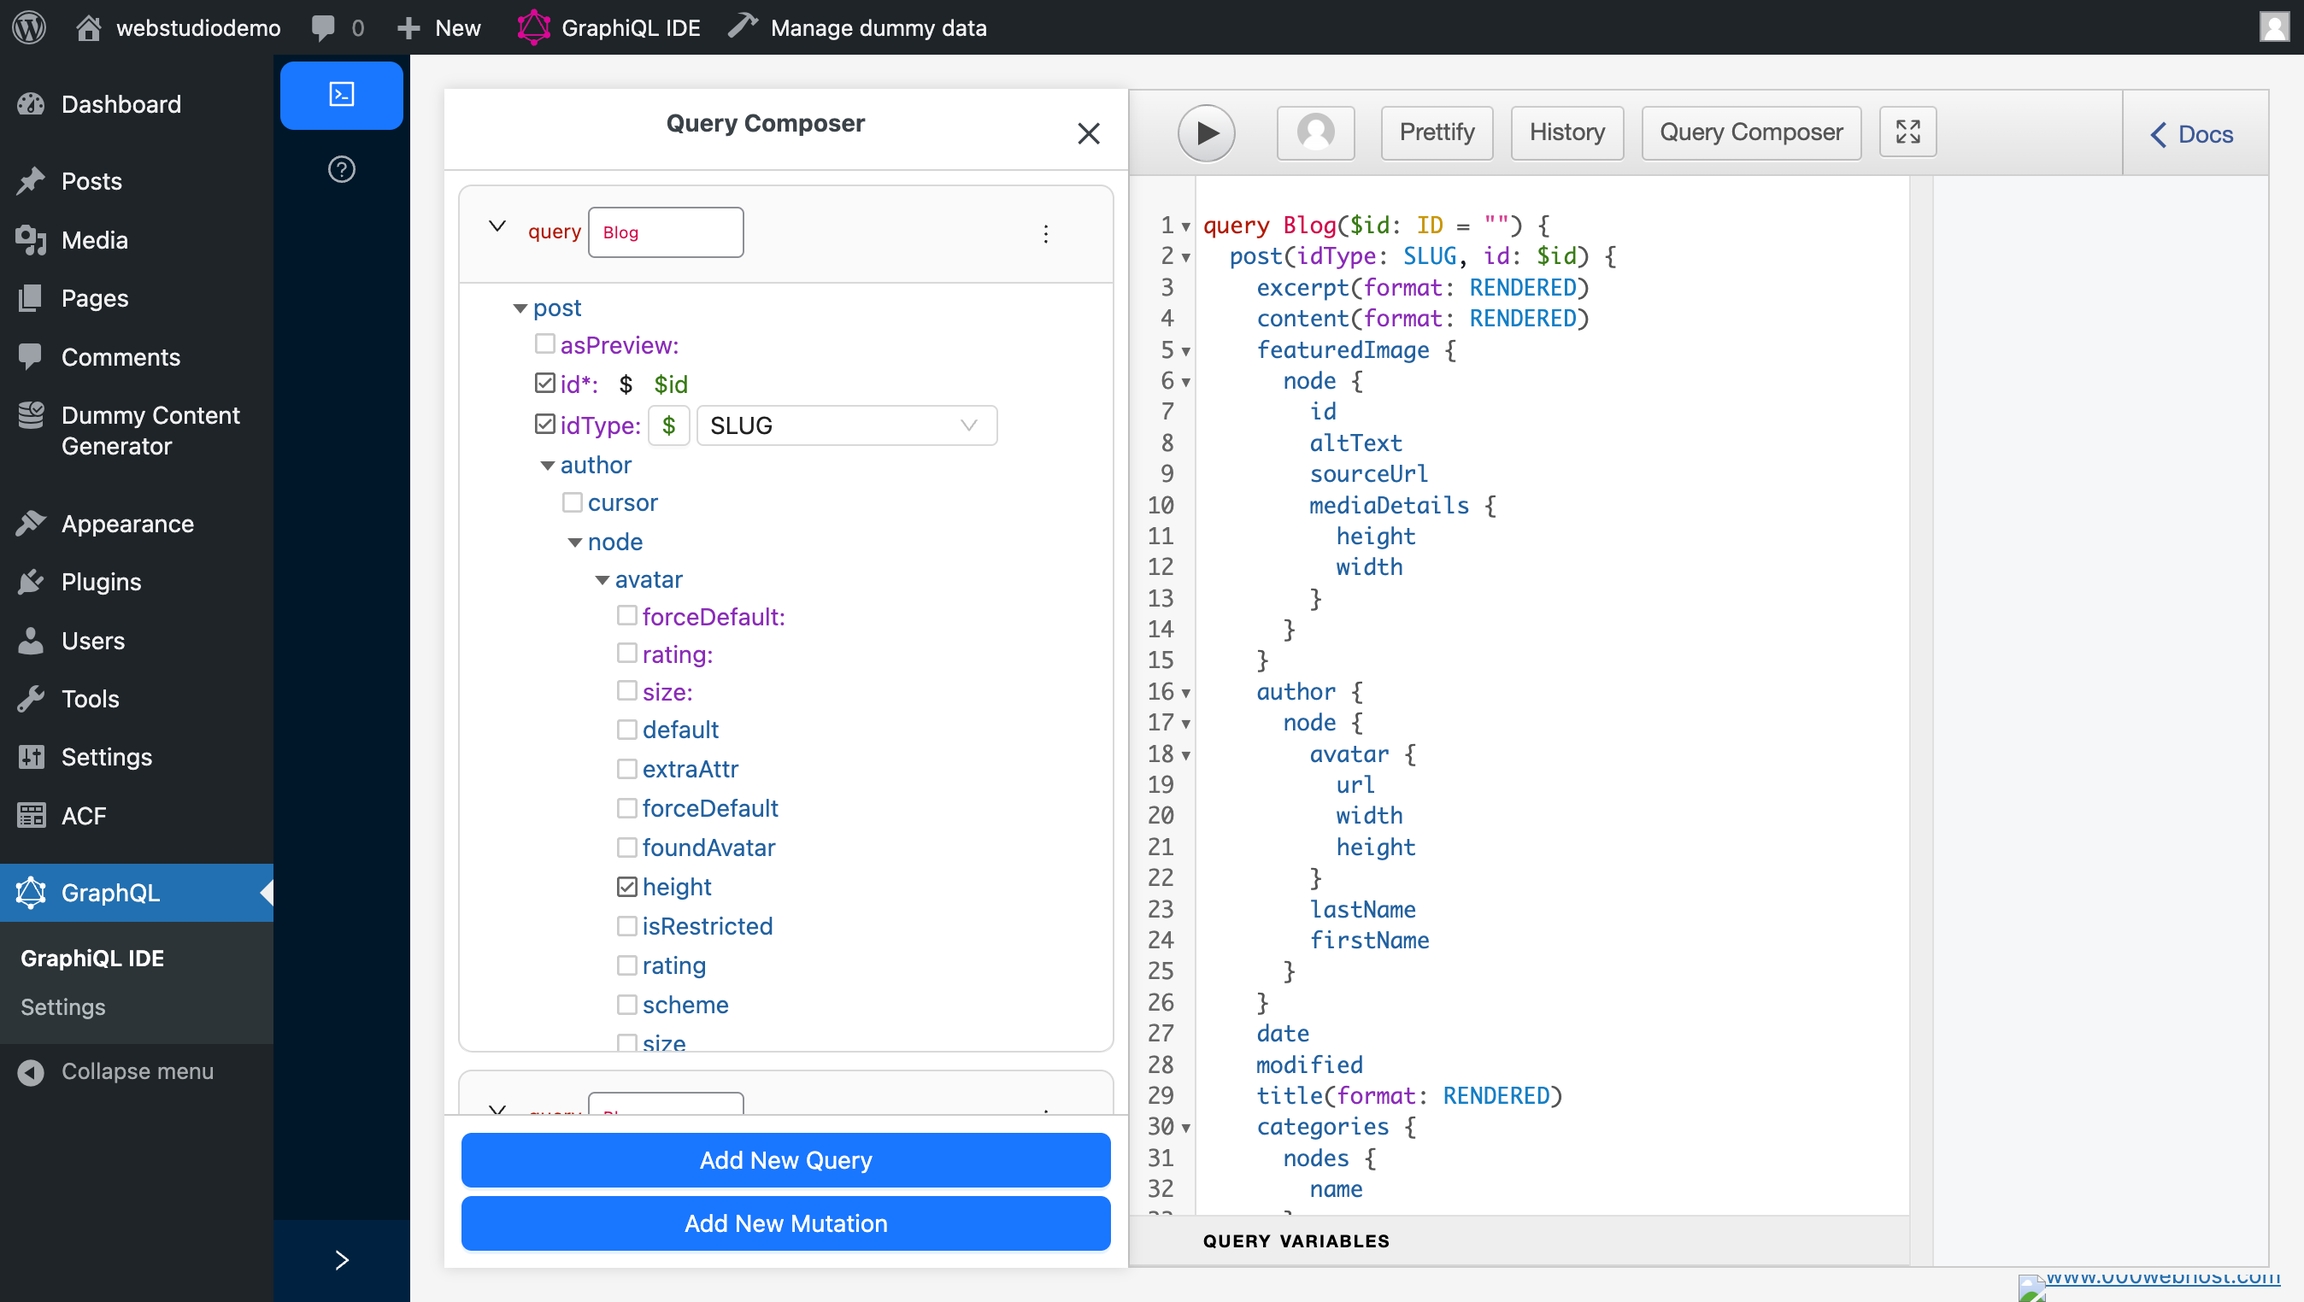
Once you have selected all the data you want to fetch, it's time to tell this query which Post you wish to fetch. The Post fetched will be determined when someone views a URL on your website. Therefore, the query needs to be dynamic.
In the Query Composer, ensure the id is selected and click the $ next to it. This informs the query that the id will be variable/dynamic. Next, you must tell it what kind of id you will pass it. Select idType and select SLUG from the dropdown.
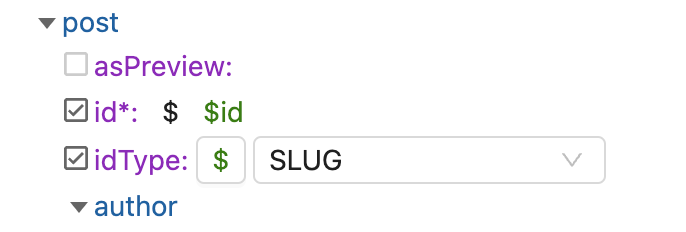
Now the query says, "I will get X, Y, and Z fields of the Post whose slug is equal to some slug you'll give me later".
Copy the query from WordPress and paste it into the query field in Webstudio.
Variables
Next, it's time to inform the query what the slug will be. When defining the dynamic page, the dynamic part (the parameter) was slug. The value of slug will be whatever URL is currently viewed.
In the variables field of the Resource, expand Expression Editor by clicking the "+".
In there, type or paste in the following:
Here's what that looks like:
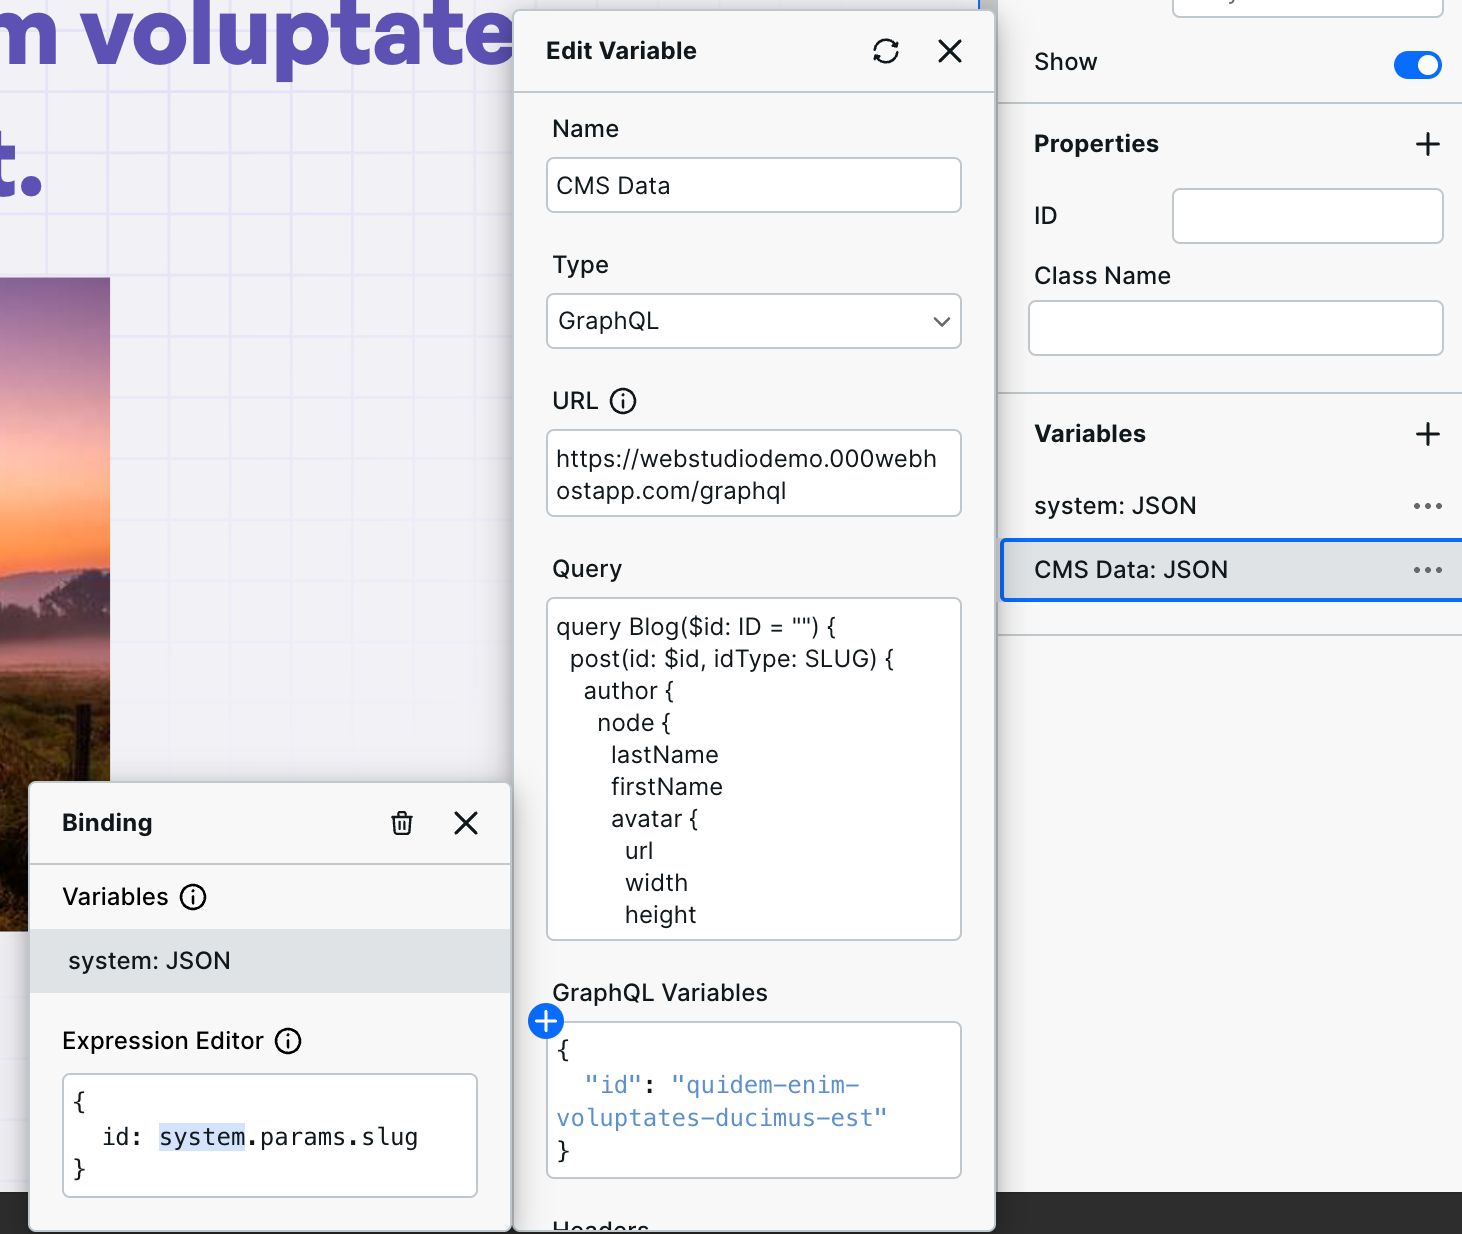
This is where the magic happens. It says, "Query, I know you are looking for an id, so use the value of the current slug". Whatever value is in the URL will be used to fetch data from WordPress.
Add a test URL
The actual value of the slug will be what's in the URL, but in the editor, you can provide a test value by going to the Address Bar and entering a slug from one of your WordPress Posts.
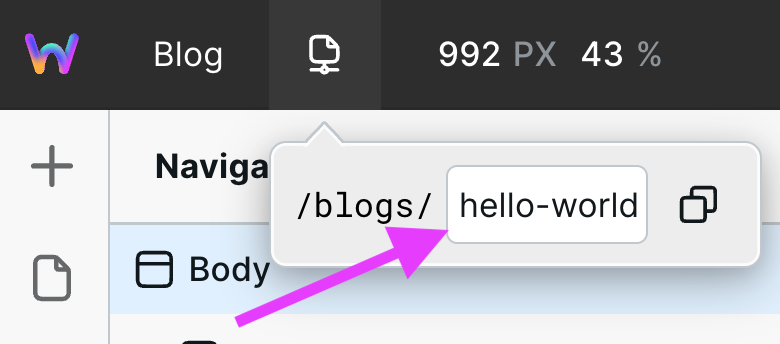
Once entered, you can inspect the variable you created to ensure Post data is returned.
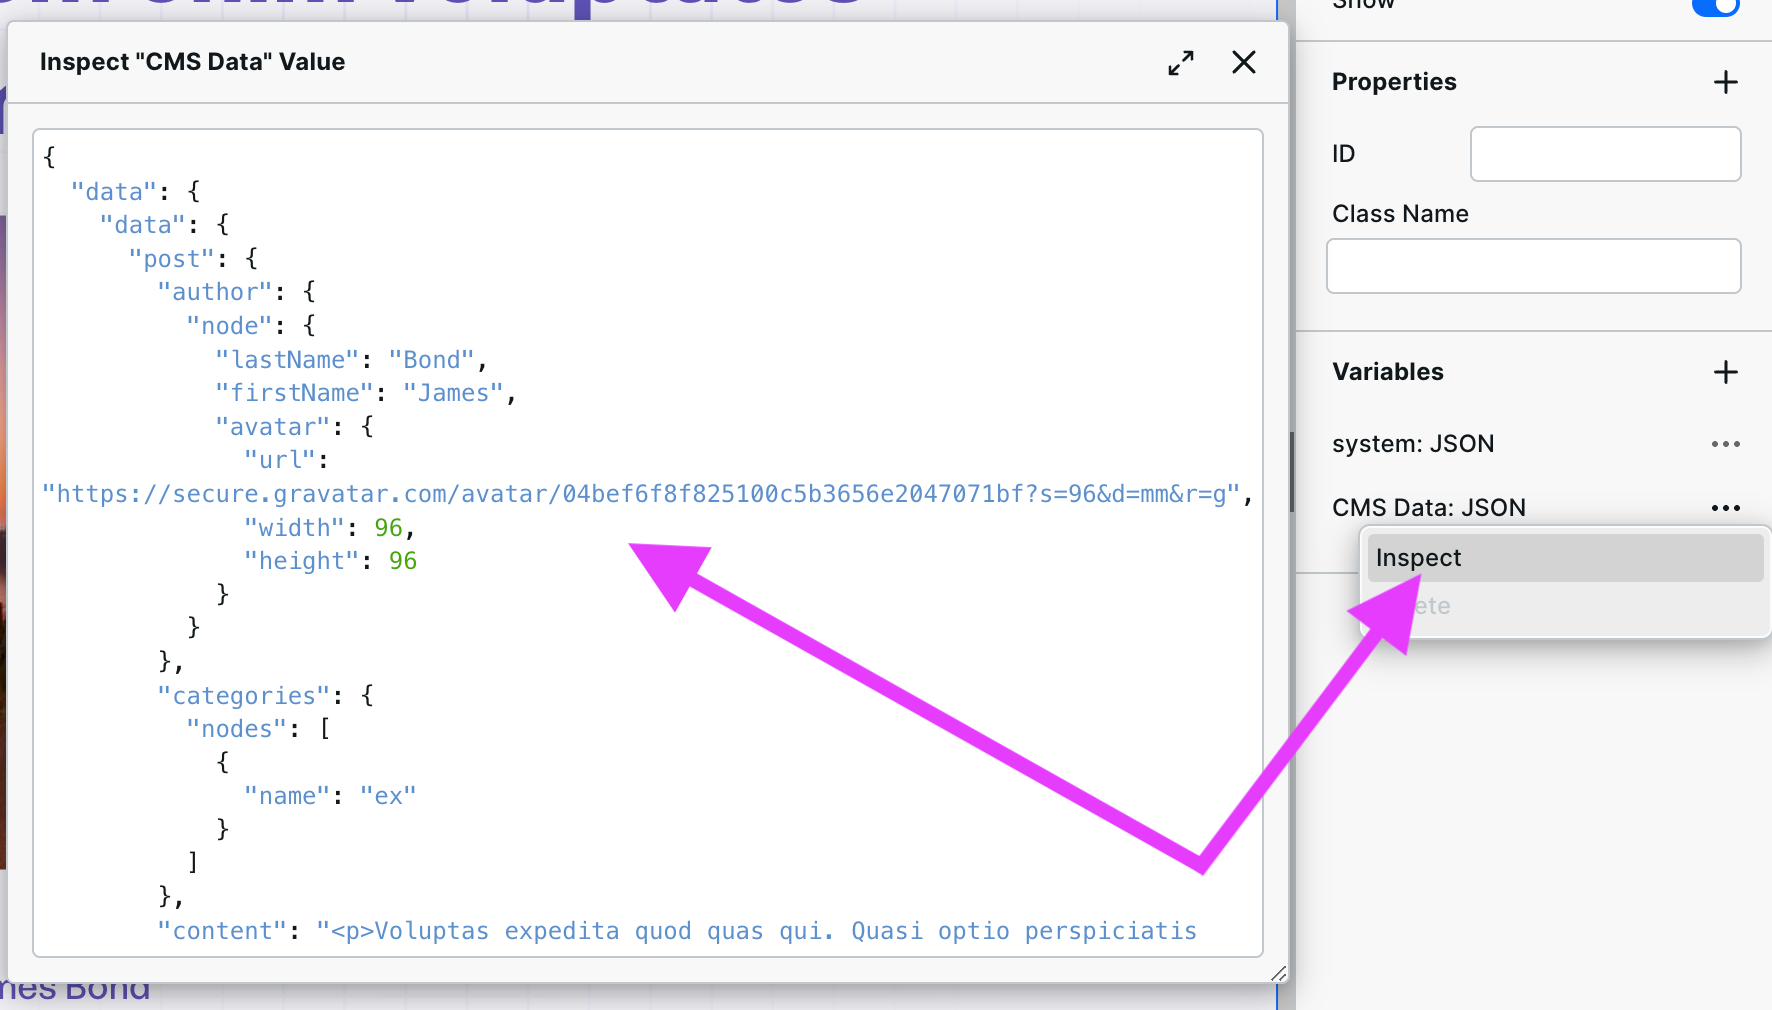
If you are not seeing data, then there is likely an issue with mapping the value from your dynamic path to the dynamic URL. If you see an error, read it and try to correct it.
Now that you are getting data, you can move to the next step, mapping or "binding" the data to the various components within Webstudio.
4 Bind WordPress data to Webstudio components
Binding enables you to connect or map values from the WordPress response (aka the WordPress data) to the Webstudio components to build your frontend.
Bind data to components
First, add the various Components you want to your page.
For each Component, go to Settings and the field to which you want to attach an external value and click the "+" to open Bindings.
In the Expression Editor, click or type the variable you created previously. From there, "drill down" or access the child fields within the variable by typing a period and selecting the field (repeat until you get the value).
Here is what that looks like:
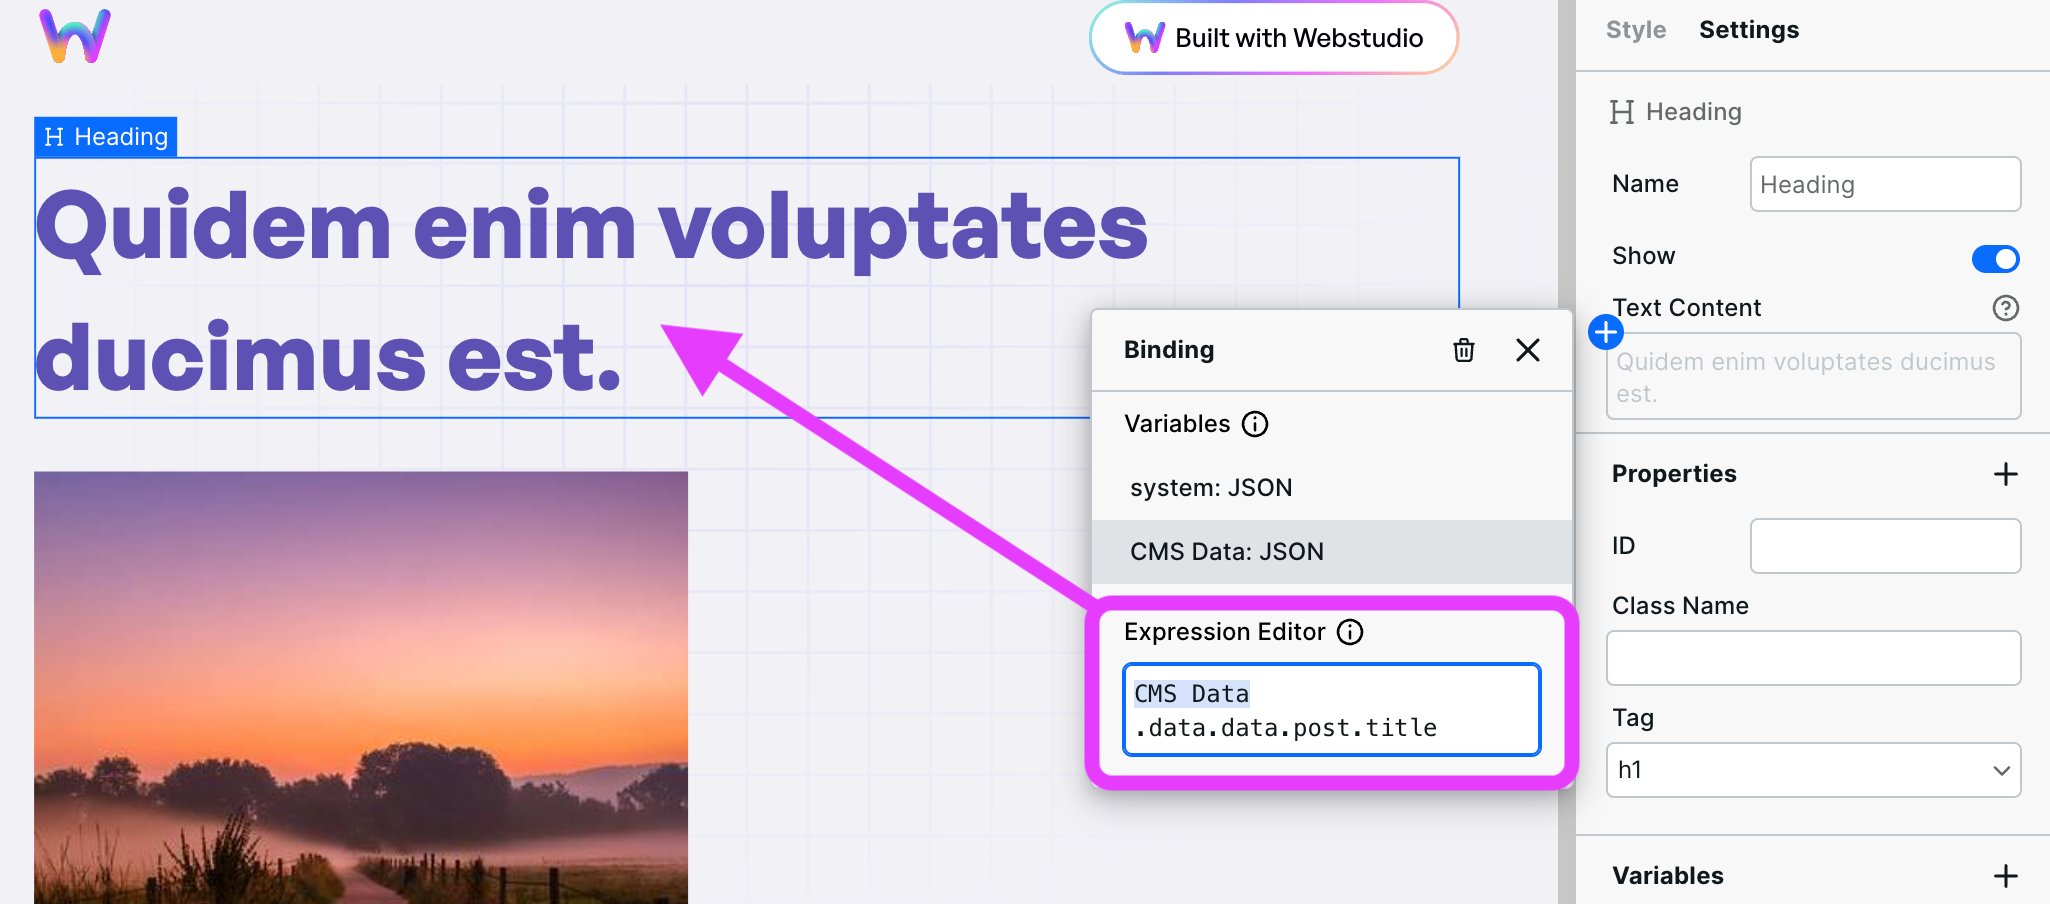
Continue this process for all components. All fields in Webstudio can have WordPress fields bound to them, including page fields like Title.
There are two particular Components to make note of:
Content Embed – Use this to bind your WordPress content that contains rich text. Content Embed enables you to style the various elements of the rich text using the style panel.
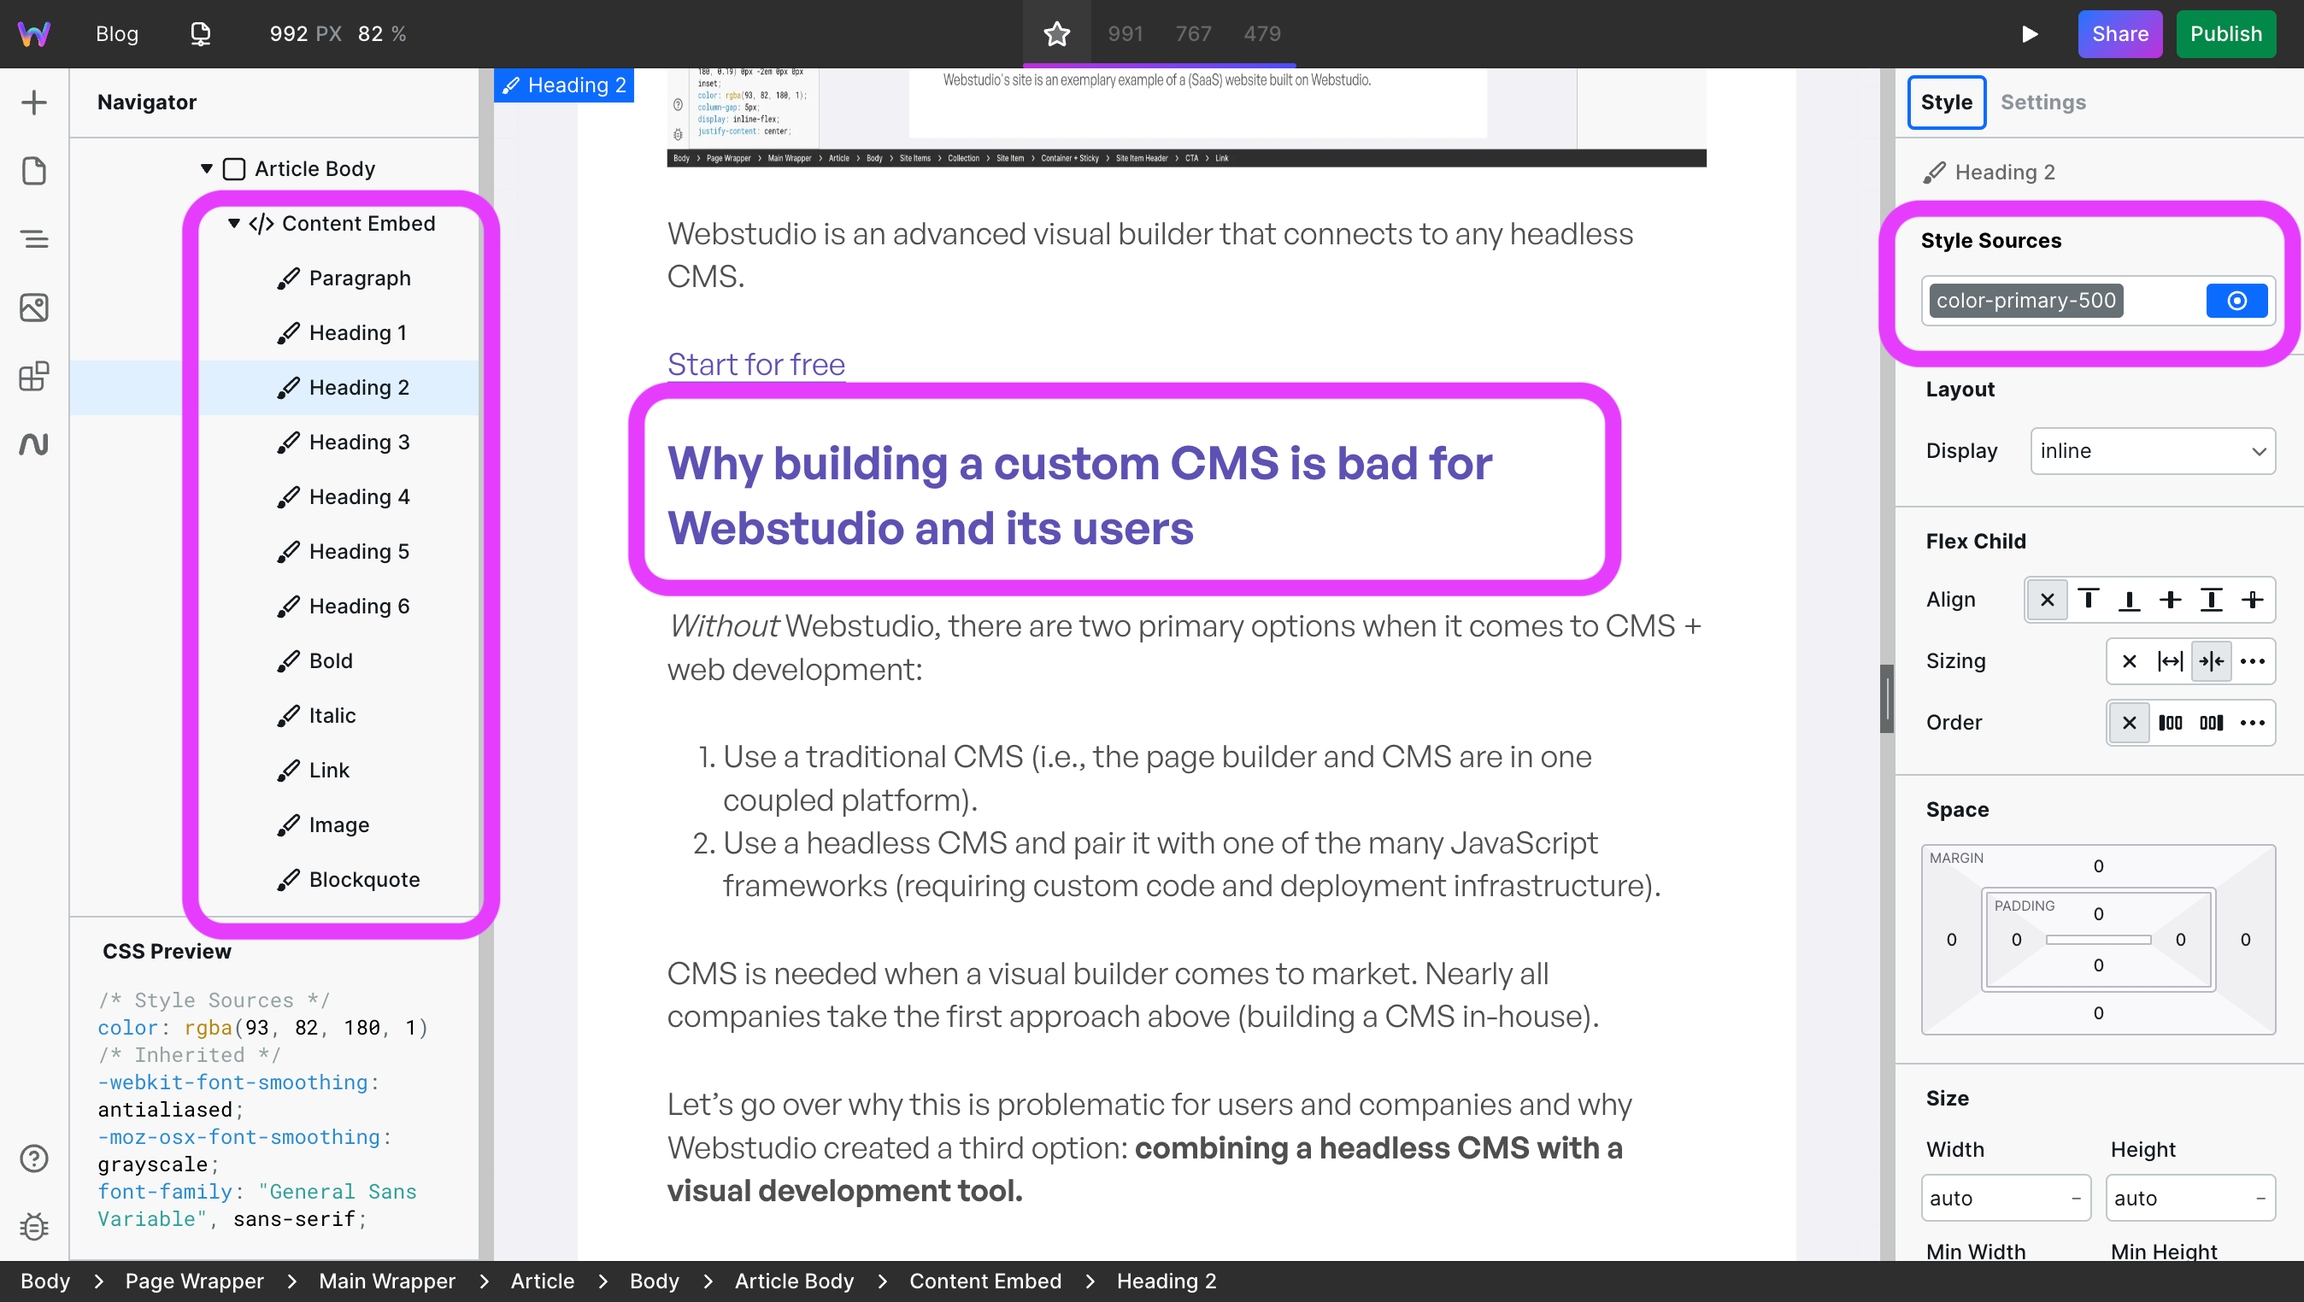
Content Embed with H2 styled using Tokens Time – Use this to format incoming dates/times. When stored in the WordPress backend, they are "ugly," this Component will make them human-readable.
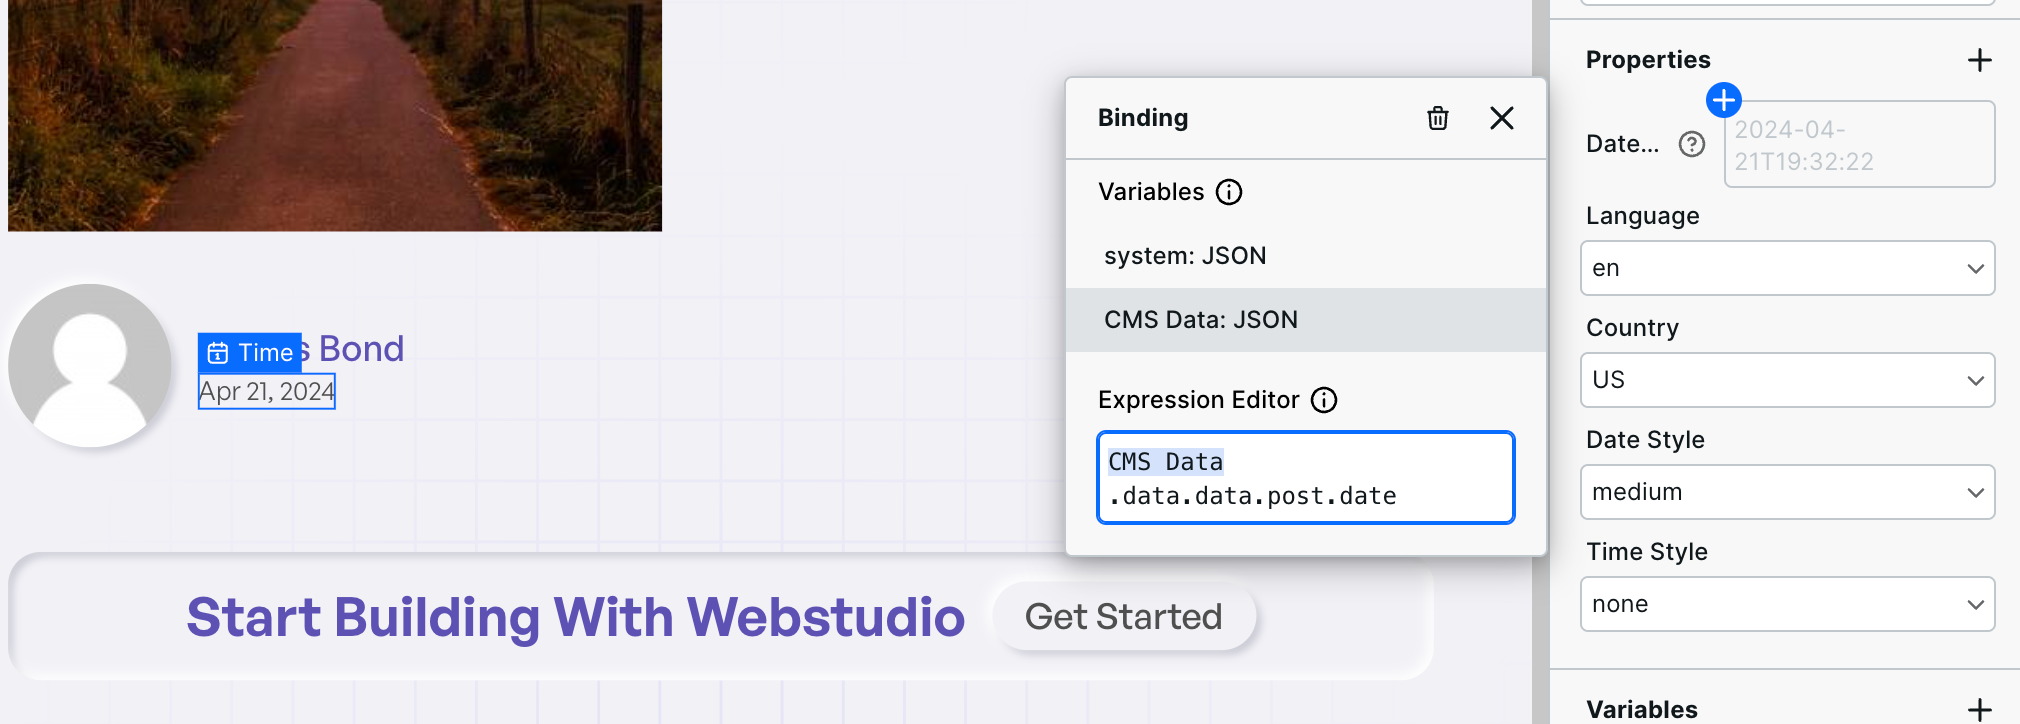
Formatted published date using Webstudio time component
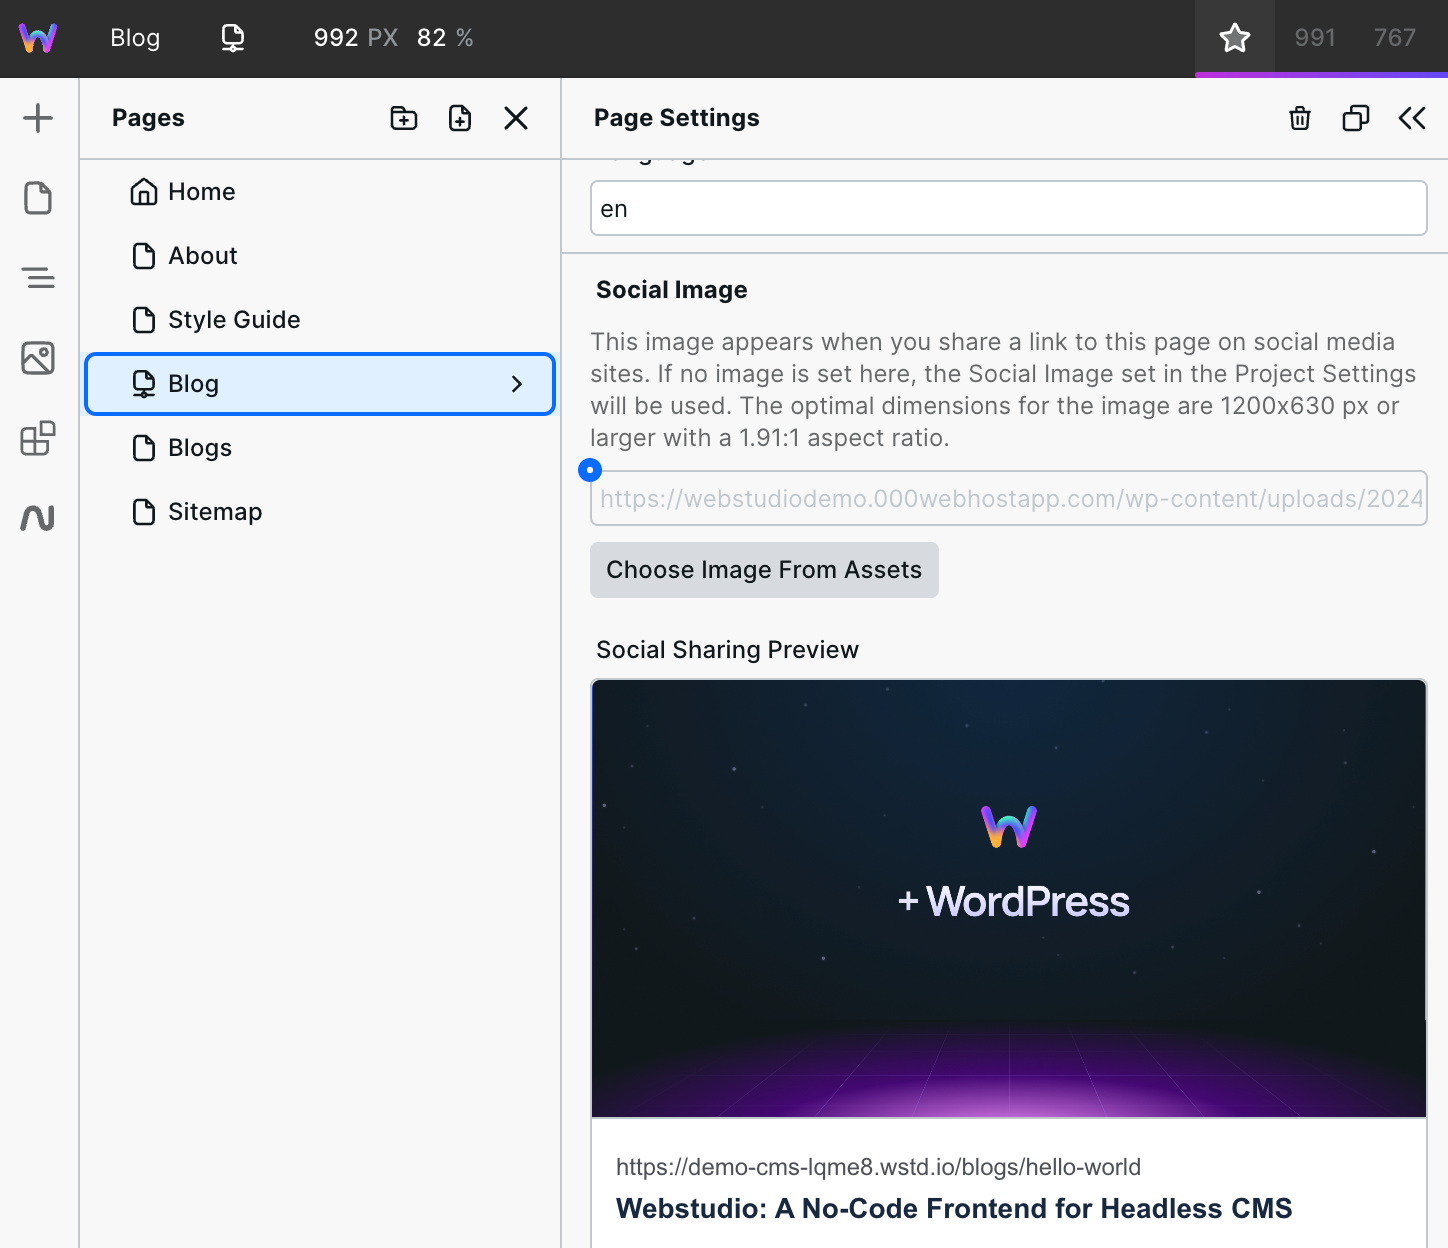
Bind data to Page Settings
Here are the Page Settings bound to WordPress values:
There is one more place to bind: the status code. You want to ensure that if there is no matching value within WordPress, the page returns a 404, not a 200.
To do this, go to Page Settings > Status Code > "+" and enter an expression.
The format will be like this:
For this example, it looks like this:
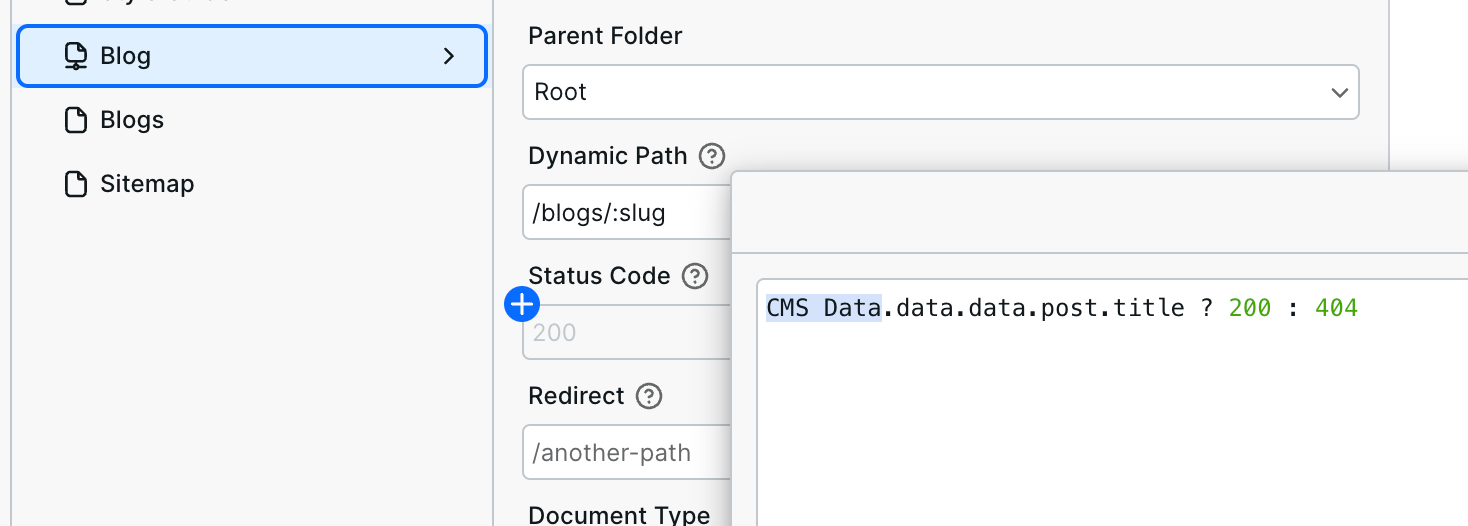
In plain text, the expression says, "If the WordPress value exists, return 200 (found); otherwise, return 404 (not found).
Well done! So far, you have successfully created a Dynamic Page, fetched the data from WordPress, and bound the data to Webstudio Components. In the following steps, these concepts will be used to create an overview page with your various Posts on one page and a sitemap for search engines.
5 Create an overview page
In this step, you will create a page that lists the various WordPress Posts and links them so that users can click on them and land on the Dynamic Page containing the proper data.
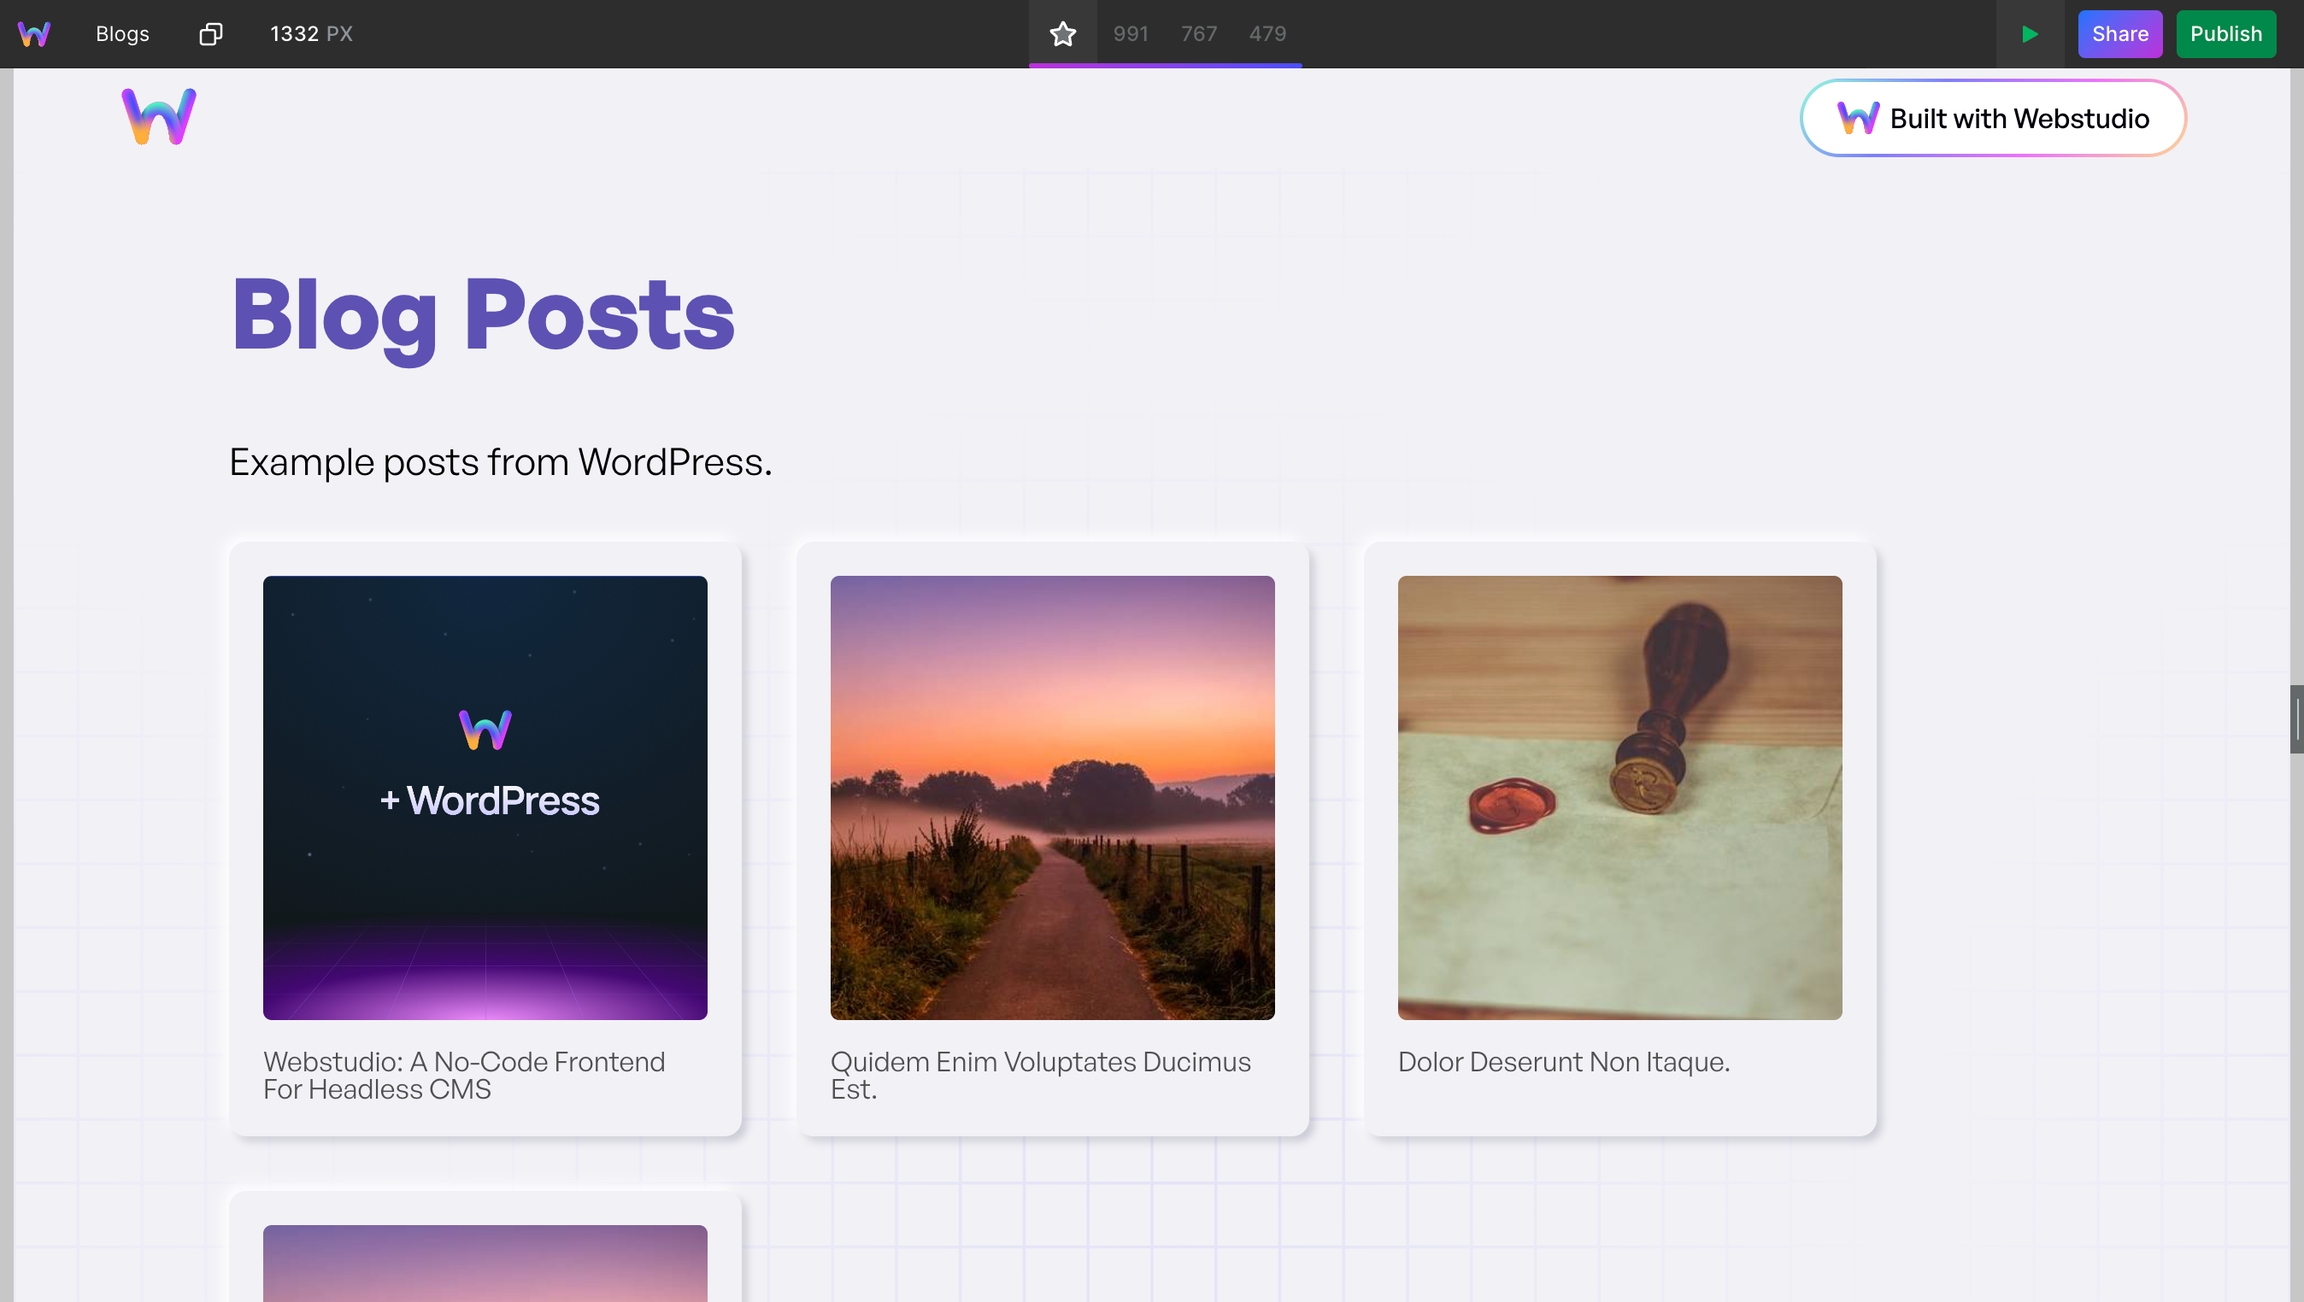
Create a new page
Create a new page and ideally give it the base path of the Dynamic Page. So, if the Dynamic Page uses /blogs/:slug, this new page should use /blogs.
Create a new Resource variable
Create a new variable, same as last time, except there will not be any variables. It should always return a list of Posts.
To do this, create a new query using the Query Composer and select Posts (plural) this time.
Select the fields you want to include, such as title, featured image, and slug.
Test the query and ensure you receive a list of Posts within the inspect tool.
Setup a Collection
Add the Collection component, which will iterate over a list of the Posts. Once you design what a Post should look like, it will be replicated for each Post. You need to bind the list of records to the Collection. Here's what that looks like:

The Collection has a default variable containing the value of the current iteration's record. The default name is "Collection Item"; however, you can rename it to "WordPress Post" for clarity.
Bind data to components
Next, bind the various values to the components, as you learned previously. You'll need to do something special for the link: prefix the slug with the base path.
Here is what that looks like in this example:
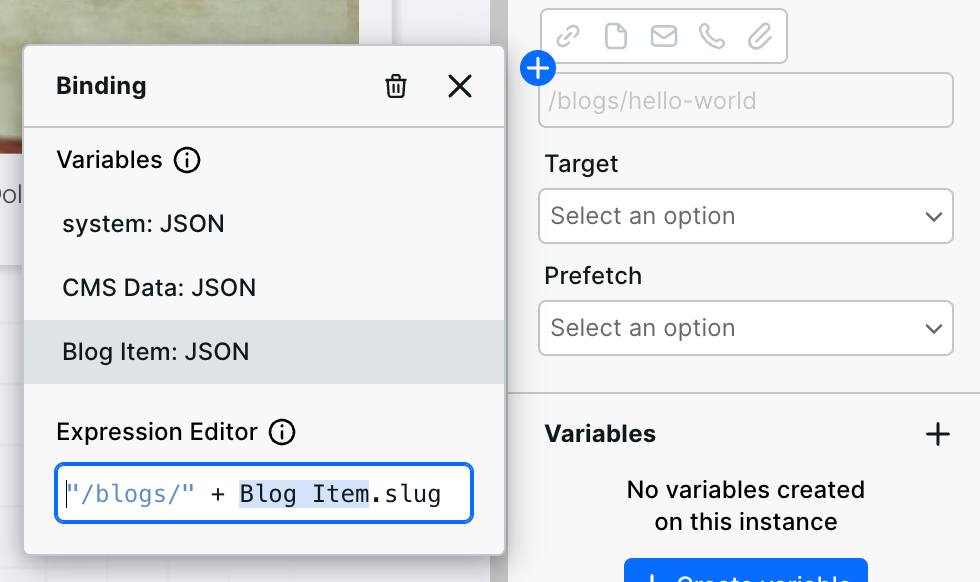
Note that the static value is in quotes ("/blogs/"), and there is a "+" to glue it together with the dynamic slug value.
This page is great for letting users browse your Posts, but you need to create a sitemap for search engines.
6 Create a sitemap
Webstudio enables you to visually build a dynamic sitemap using Collections and XML Nodes.
Here's how to do it:
Go to Marketplace > Pages > CMS Sitemap > and click Sitemap. This will insert a template sitemap as a new page.
Add a new Resource that fetches your slugs and, optionally, the record's updated time to inform search engines when the last edit was made.
Bind those values.
Refer to this video chapter for a full demonstration of building a sitemap.
Start using Webstudio as a frontend for your headless WordPress site
In this headless WordPress tutorial, you learned how to set up a WordPress site to be headless, use GraphQL to fetch data, and build a frontend using Webstudio (no need for React, Vue, Next.js or any other JavaScript frameworks).
Additional info:
The flexibility of Resources enables you to fetch exactly what you need from WordPress and even multiple content management systems/databases (e.g., Airtable for team members and WordPress for blog posts).
Webstudio does not charge by site, meaning you can build frontends for many headless WordPress sites.
Content creation/editing continues to exist in your WordPress dashboard. There is no need to republish Webstudio upon publishing/updating WordPress content. This is because Webstudio does not use static site generation – it's dynamic.
Pagination
The demo did not show how to paginate your WordPress content, so this section will show you.
Use pagination only if necessary. Users and search engines prefer minimal navigation.
First, start by going to the Marketplace > WordPress > and insert the Posts page.
The Posts page contains:
A query ready for pagination
A
Posts Per Pagevariable on the body that lets you define how many posts should displayAccessibility and SEO-friendly pagination that will display if the amount of posts in WordPress exceeds the
Posts Per PagenumberFirst/Next buttons with conditional display to hide the links if at the beginning or end
This method of pagination relies on cursors, which define the last ID on the page, letting you fetch the next batch of posts after that ID when navigating.
The template has intentionally left out a previous button because going backward causes two URLs per page, such as ?after=abc and ?before=ghi, which is not good for SEO. Users can, however, use their browser back feature.
If you want to use an alternative method for pagination, check out the WP GraphQL Offset plugin. This method uses an offset to skip posts depending on which page you are on. It also enables the use of a previous button if that's important to you. The Hygraph template uses this method to give you an idea of how to implement it.
Converting your existing query
If you have an existing query, it will need to be modified if it uses posts.nodes, and not posts.edges.node.
If your query looks like this:
It will now look like this:
The contents of posts.edges.node in the second query are exactly the same as the contents of posts.nodes from the first query. Therefore, you can copy the contents of posts.nodes and paste them into posts.edges.node.
The rest of the second query provides context about whether there are previous or next pages and introduces filters to fetch the next batch of content.
If you already setup a page using posts.nodes, you will need to rebind the values on your page because the Resource response will be different. For example, Post Item.node.title instead of Post Item.title.
Related
CMS – Learn about dynamic pages and Resources in Webstudio
Variables – Understand GraphQL Resource variables
Collection – Display multiple posts from WordPress
Hygraph Integration – Another GraphQL-based CMS option
Flotiq Integration – Headless CMS with GraphQL API support
Last updated
Was this helpful?

