> For the complete documentation index, see [llms.txt](https://docs.webstudio.is/llms.txt). Markdown versions of documentation pages are available by appending `.md` to page URLs; this page is available as [Markdown](https://docs.webstudio.is/university/foundations/assets.md).
# Assets
Upload and manage images, fonts, and other files used in your project.
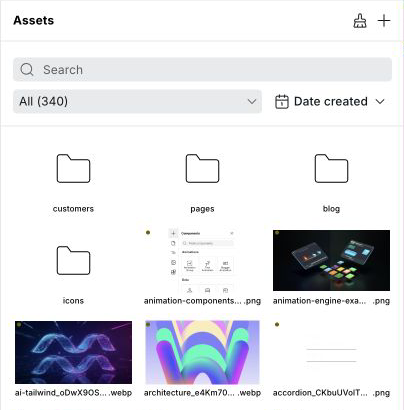
The Assets panel is located on the left side of the builder. It stores all static files used in your project — images, fonts, documents, and more. Upload files here and then reference them in instances and styles throughout your site.
## Supported file types
| Category | Formats |
| --------------- | ----------------------------------------- |
| **Images** | JPEG, PNG, GIF, WebP, SVG, AVIF, ICO, BMP |
| **Fonts** | WOFF, WOFF2, TTF, OTF |
| **Video** | MP4, MOV, AVI, WebM |
| **Audio** | MP3, WAV, OGG, M4A |
| **Documents** | PDF, DOC, DOCX, XLS, XLSX, CSV, PPT, PPTX |
| **Code & text** | TXT, MD, MDX, JS, CSS, JSON, HTML, XML |
| **Archives** | ZIP, RAR |
{% hint style="info" %}
JPEG, PNG, GIF, WebP, SVG, and AVIF images are automatically optimized and resized by Cloudflare. ICO and BMP images are served as-is without optimization.
{% endhint %}
## Uploading assets
Drag files directly into the Assets panel, drop them anywhere on the panel, or click the upload icon in the panel header. Multiple files can be uploaded at once. For images, you can also drag a URL directly from the browser to upload from an external source.
Open a folder before uploading to add the new assets directly to that folder.
### Add an image directly to the canvas
Drag one image asset from the Assets panel onto the canvas to insert an **Image** component with that asset already selected as its source. Drop it at the insertion indicator like a component from the Components panel. Dragging multiple selected assets does not insert multiple Image components.
### Create and edit text files
Open the add menu in the Assets panel and choose **Create text file**. Enter a supported filename, such as `notes.md`, `article.mdx`, or `data.json`. Webstudio creates the file in the current folder and opens it in the code editor. New JSON files start with an empty object so the Content Engine can index them immediately.
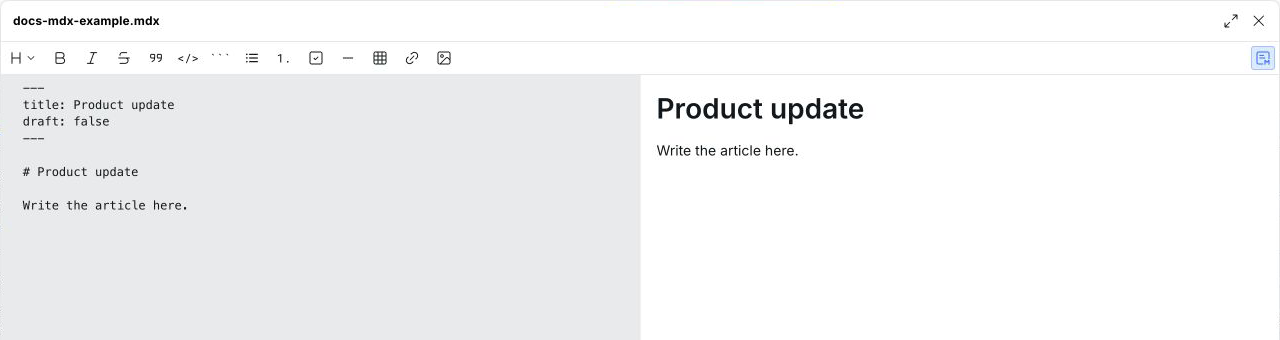
You can open uploaded `txt`, `csv`, `md`, `mdx`, `js`, `css`, `json`, `html`, `xml`, and `svg` assets in the same editor. Syntax highlighting follows the file type; unsupported text types use plain text. Markdown and MDX files also provide formatting controls and a preview.
MDX files use the same Markdown document features and additionally support Webstudio elements for content that Markdown cannot represent. Rename a `.md` file to `.mdx` to enable MDX parsing. Webstudio does not rewrite the file while renaming it; invalid MDX remains editable and reports source-located errors.
Edit MDX source and review its rendered preview side by side.
Edits save when the editor loses focus or when you press `Command + S` on macOS, `Ctrl + S` on Windows, or `Command/Ctrl + Enter`. Edit the complete filename in Asset settings to rename a text file or change its format. When you change the extension to `.json`, Webstudio validates the existing content and converts JSON-compatible syntax to strict JSON before saving the new file revision. JSON files can contain any JSON value, including arrays and scalars. The editor accepts unquoted object keys, single-quoted strings, and trailing commas. It reports unsupported syntax instead of saving the file. Converting an empty text file to `.json` initializes it with an empty object.
### Use assets as content
Markdown, MDX, and JSON files in Assets can be the source of truth for a site. The Content Engine reads their structured fields, queries the files, and resolves links between them. See [Content Engine](/university/foundations/content-engine.md) for the supported file structure and a complete article workflow. Connect an MDX file to a [Content Block](/university/core-components/content-block.md#store-content-in-an-mdx-file) when editors should update its body visually in Content mode.
## Organizing assets with folders
Create folders in the Assets panel to organize large asset libraries. Folders can contain both assets and other folders. Open a folder to view its contents, and use the breadcrumbs above the asset grid to move back through the folder hierarchy.
Assets remembers the last open folder for each project in your browser. Reopen the panel or reload the Builder to return to that folder. If the folder was deleted, the panel opens at the root instead.
You can:
* Drag assets and folders into another folder.
* Use **Move** to choose a destination without dragging.
* Cut, copy, paste, and duplicate assets or complete folder trees.
* Rename or delete folders.
Open **Folder settings** to change a folder's name or parent folder. Valid changes save automatically; there is no Save button. Blank names and names already used in the selected parent folder are not saved.
Duplicating a folder copies its nested folders and assets. Deleting a folder deletes everything inside it, so review the confirmation before continuing.
### Use a folder as a content collection
Turn on **Use as content collection** when creating a folder, or choose it from an existing folder's menu, when editors should create structured MDX entries without writing frontmatter by hand. Webstudio adds `collection.json`, which defines the entry fields, and an MDX entry template. The folder remains a regular Assets folder.
Use **Configure collection** to define the form fields, starting content, and the dynamic entry page. Editors can then choose **New entry**, update fields in **Entry settings**, edit the source through **Edit file**, or choose **Open on canvas** to edit the complete article visually. See [Content Engine](/university/foundations/content-engine.md#make-the-folder-a-content-collection) for collection setup, validation, and publishing behavior.
### Select and update multiple items
Select multiple assets and folders to move, copy, cut, duplicate, or delete them together:
* Hold `Command` on macOS or `Ctrl` on Windows and click to add or remove an item from the selection.
* Hold `Shift` and click to select a range.
* Drag across empty space in the asset grid to select items with a marquee.
The familiar `Command` or `Ctrl` shortcuts for copy, cut, paste, and duplicate work while the Assets panel is focused. Press `Backspace` to delete the selection. The panel scrolls automatically when you drag selected items near the top or bottom of a long list.
## Search
Type in the search field at the top of the Assets panel to filter assets and folders by name. Search can surface matching content inside nested folders.
## Filtering and sorting
Use the filter dropdown to show only a specific category: All, Images, Documents, Video, Audio, Code, Archives, or Fonts.
Sort assets by:
* **Alphabetical** — A→Z or Z→A
* **Date created** — newest or oldest first
* **File size** — largest or smallest first
Folders are included in the current search and sort order.
## Asset details
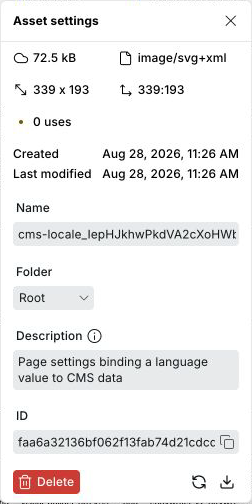
Hover any asset and click the gear icon to open its detail panel:
* **File size** and **MIME type**
* **Dimensions** and **Aspect ratio** (images only)
* **Uses** — how many places in the project reference this asset
* **Name** — editable; used as the filename in URLs
* **Description** — used as the default `alt` text for images
* **ID** — unique identifier, can be copied to clipboard
## Deleting assets
Delete and download buttons are available inside the asset detail panel (gear icon on hover):
* **Unused assets** can be deleted immediately.
* **Assets in use** show a "Review & delete" button that lists every usage with clickable links to each location, so you can review the impact before confirming.
* **Delete unused assets** — click the brush icon in the Assets panel header to review all unreferenced assets. Every asset is selected by default. Uncheck assets you want to keep, or use **Select all** to change the complete selection. Confirming deletes only the selected assets.
## Downloading assets
You can download any original asset file to your computer. Downloading is available on the Pro plan.
## Using assets
Once uploaded, assets are available in:
* **Image component** — select an asset as the image source
* **Background image** — pick an asset in the Style Panel under Backgrounds
* **Custom fonts** — uploaded font files are automatically available in the Typography section of the Style Panel
## Organizing assets with AI agents
Webstudio MCP exposes the same folder hierarchy to connected agents. An agent can list, create, rename, move, recursively duplicate, and recursively delete folders. It can also upload assets into a folder or move existing assets between folders. This keeps automated asset work visible and editable in the Builder.
## Related
* [Content Engine](/university/foundations/content-engine.md) – Build sites from Markdown, MDX, and JSON files in Assets
* [Content Block](/university/core-components/content-block.md) – Edit an MDX document visually in Content mode
* [Anatomy of the builder](/university/foundations/anatomy-of-the-webstudio-builder.md) – Overview of all builder panels
* [Image](/university/core-components/image.md) – Display images from assets or external URLs
* [Commands & search](/university/foundations/commands-and-search.md) – Quickly find and delete unused assets
* [How to use custom fonts](/university/how-tos/how-to-use-custom-fonts.md) – Upload and apply font files
---
# Agent Instructions
This documentation is published with GitBook. GitBook is the documentation platform designed so that both humans and AI agents can read, navigate, and reason over technical content effectively. Learn more at gitbook.com.
## Querying This Documentation
If you need additional information that is not directly available in this page, you can query the documentation dynamically by asking a question.
Perform an HTTP GET request on the current page URL with the `ask` query parameter, and the optional `goal` query parameter:
```
GET https://docs.webstudio.is/university/foundations/assets.md?ask=&goal=
```
`ask` is the immediate question: it should be specific, self-contained, and written in natural language.
`goal` is optional and describes the broader end goal you are ultimately trying to accomplish on behalf of the user. GitBook uses it to tailor the answer towards what is most useful for that goal.
The response will contain a direct answer to the question and relevant excerpts and sources from the documentation.
Use this mechanism when the answer is not explicitly present in the current page, you need clarification or additional context, or you want to retrieve related documentation sections.