> For the complete documentation index, see [llms.txt](https://docs.webstudio.is/llms.txt). Markdown versions of documentation pages are available by appending `.md` to page URLs; this page is available as [Markdown](https://docs.webstudio.is/contributing/contributions.md).
# Contributions
Contribute fixes and improvements to Webstudio as a designer or developer.
## Process
If you want to contribute and don't know where to start, here is a step-by-step for a complete lifecycle, from idea to deployment.
1. If you have an idea that is not already in [issues](https://github.com/webstudio-is/webstudio/issues), open an issue or reach out on [Discord](https://wstd.us/community).
2. After submitting an enhancement or a bug, we need to agree on a solution. You can jump into implementation right away, but be aware that we have to agree on the solution in the end. Communicating the problem you are solving and why you think the approach you are taking is the best is key for a quick process.
In fact, we are happy to help you communicate your ideas, so if you are not sure - talk to us on discord.
3. When the implementation is in a mergeable state, a core team member will deploy it to production.
## Contributions for designers
Open the Webstudio repository in a local coding agent such as Codex and ask it to start the Builder locally. Open the URL it provides, then describe the changes you want and review them in the running interface.
The agent can handle setup, make the code changes, run the relevant checks, and help prepare the contribution. Follow the process above so the problem and solution are agreed before the change is merged.
## Contributions for developers
Before contributing to the Builder UI, become familiar with the [Design Docs](https://www.figma.com/file/xCBegXEWxROLqA1Y31z2Xo/%F0%9F%93%96-Webstudio-Design-Docs?type=design\&node-id=234%3A36754\&t=w3VxT162RQF0gTrI-1) and [Webstudio Library](https://www.figma.com/file/sfCE7iLS0k25qCxiifQNLE/%F0%9F%93%9A-Webstudio-Library?type=design\&node-id=2647%3A10046\&t=f4xr8mcumXfXkHVh-1). Use the established design system so new UI feels like a natural part of Webstudio. Ask questions or share feedback on [Discord](https://wstd.us/community).
## Running the Webstudio project using VS Code
### Prerequisites
* VS Code installed: [Download VS Code](https://code.visualstudio.com/Download)
* Docker installed: [Install Docker](https://docs.docker.com/get-docker/)
### Steps
1. Install the "Dev Containers" extension in VS Code:
* Open VS Code.
* Go to the Extensions view by clicking the Extensions icon in the Activity Bar on the side of the window.
* Search for "Dev Containers" and click Install. Alternatively, you can install it from the recommended extensions listed in the Webstudio project.
2. Fork and clone the Webstudio repository:
* Fork the repository on GitHub.
* Clone your forked repository to your local machine.
3. Open the repository in VS Code:
* Open VS Code.
* Select "File" > "Open Folder" and choose your project folder.
4. Reopen in Container:
* Once your folder is open, you might see a notification asking if you want to reopen in a container. Click "Reopen in Container".
* If you don't see a notification, press `F1`, type `Dev Containers: Reopen in Container`, and select it.
VS Code will now build the Docker container and open the Webstudio project inside it. This process will take some time as the environment is set up and dependencies are installed.
5. Run the development server:
* After the setup completes, open the terminal in VS Code.
* Run the following command:
```sh
pnpm dev
```
6. Open the application in your browser:
* After running `pnpm dev`, you will see a URL in the console that looks like this:
```
➜ Local: https://wstd.dev:5173/
```
* Cmd + click on the URL in the console to open it in your browser.
{% hint style="danger" %}
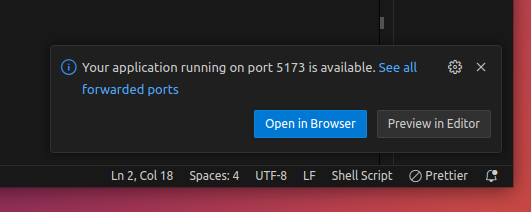
If VS Code shows you an "Open Browser" button, it will lead you to the wrong URL as they are only watching ports. Be sure to use `wstd.dev` and **NOT** `localhost`. The proper URL will show in the console.\
\  {% endhint %}
## Login locally
When downloading the app you will have two options for login and they both work in different ways.
### Dev login
Dev login will create you a dev account so you don't need to be online or create a github app. To enable you create a file `.env.development` in `apps/builder` and include two lines:
```
DEV_LOGIN=true
AUTH_SECRET=a random value
```
To login in the app click on the "Login with Secret" button and paste your `AUTH_SECRET` in the input.\
To log in as another user in dev mode, use your AUTH\_SECRET, followed by : and any email address. For example: \`abcd:\`\\
### GitHub Login
To login and use GitHub login you will need to create an OAuth app with the following values:
```
Name: Webstudio
Homepage URL: http://localhost:3000
Authorization callback URL: http://localhost:3000/auth/github/callback
```
> When creating the app with `http://localhost:3000` you will need to always open your app at `http://localhost:3000` for the GitHub login to work.
After the app is created you will need to create a client secret and then copy that value and your client id to the `.env` file:
```
GH_CLIENT_SECRET=
GH_CLIENT_ID=
```
You are done! 🎉
## Related
* [Contributing to the Marketplace](/contributing/marketplace.md) – Submit templates and sections
* [FAQs](/basics/faq.md) – Common questions including licensing information
* [Roadmap & Links](/basics/roadmap-and-links.md) – See what the team is working on
---
# Agent Instructions
This documentation is published with GitBook. GitBook is the documentation platform designed so that both humans and AI agents can read, navigate, and reason over technical content effectively. Learn more at gitbook.com.
## Querying This Documentation
If you need additional information that is not directly available in this page, you can query the documentation by asking a question.
Perform an HTTP GET request on the following URL with the `ask` and `goal` query parameters:
```
GET https://docs.webstudio.is/contributing/contributions.md?ask=&goal=
```
`ask` is the immediate question: it should be specific, self-contained, and written in natural language.
`goal` is what the user is ultimately trying to achieve, the reason they need the answer. Sharing it helps GitBook give you a better, more relevant answer. A goal is most helpful when it describes the outcome the user wants rather than restating the question. For example, with `ask=how do I create an API token`, a goal like `automate deployments from our CI pipeline` lets GitBook tailor the answer to that use case.
The response will contain a direct answer to the question and relevant excerpts and sources from the documentation.
Use this mechanism when the answer is not explicitly present in the current page, you need clarification or additional context, or you want to retrieve related documentation sections.
{% endhint %}
## Login locally
When downloading the app you will have two options for login and they both work in different ways.
### Dev login
Dev login will create you a dev account so you don't need to be online or create a github app. To enable you create a file `.env.development` in `apps/builder` and include two lines:
```
DEV_LOGIN=true
AUTH_SECRET=a random value
```
To login in the app click on the "Login with Secret" button and paste your `AUTH_SECRET` in the input.\
To log in as another user in dev mode, use your AUTH\_SECRET, followed by : and any email address. For example: \`abcd:\`\\
### GitHub Login
To login and use GitHub login you will need to create an OAuth app with the following values:
```
Name: Webstudio
Homepage URL: http://localhost:3000
Authorization callback URL: http://localhost:3000/auth/github/callback
```
> When creating the app with `http://localhost:3000` you will need to always open your app at `http://localhost:3000` for the GitHub login to work.
After the app is created you will need to create a client secret and then copy that value and your client id to the `.env` file:
```
GH_CLIENT_SECRET=
GH_CLIENT_ID=
```
You are done! 🎉
## Related
* [Contributing to the Marketplace](/contributing/marketplace.md) – Submit templates and sections
* [FAQs](/basics/faq.md) – Common questions including licensing information
* [Roadmap & Links](/basics/roadmap-and-links.md) – See what the team is working on
---
# Agent Instructions
This documentation is published with GitBook. GitBook is the documentation platform designed so that both humans and AI agents can read, navigate, and reason over technical content effectively. Learn more at gitbook.com.
## Querying This Documentation
If you need additional information that is not directly available in this page, you can query the documentation by asking a question.
Perform an HTTP GET request on the following URL with the `ask` and `goal` query parameters:
```
GET https://docs.webstudio.is/contributing/contributions.md?ask=&goal=
```
`ask` is the immediate question: it should be specific, self-contained, and written in natural language.
`goal` is what the user is ultimately trying to achieve, the reason they need the answer. Sharing it helps GitBook give you a better, more relevant answer. A goal is most helpful when it describes the outcome the user wants rather than restating the question. For example, with `ask=how do I create an API token`, a goal like `automate deployments from our CI pipeline` lets GitBook tailor the answer to that use case.
The response will contain a direct answer to the question and relevant excerpts and sources from the documentation.
Use this mechanism when the answer is not explicitly present in the current page, you need clarification or additional context, or you want to retrieve related documentation sections.